Advanced Networking
ELEC-E7321
Linux Networking
This is a short section that introduces some tools that may be useful for network experimentation.
The Control Interface: IP and iptables tools
Linux uses Netlink sockets to control various attributes related to routing, network interfaces and and networking in general. If you are interested about the Netlink sockets in more detail, this blog has a detailed example of how the Netlink sockets are used to configure routes.
Netlink sockets can be used by different protocols that control different
aspects of networking. For example, NETLINK_ROUTE is used to control routing
and interfaces, and NETLINK_NETFILTER is used to control the Netfilter
framework that can be used to implement firewalls and network address
translation (NAT).
Note that most Netlink socket operations – and therefore the commands using
Netlink sockets introduced below – require admin privileges and therefore need
to be run with sudo.
The IP tool
Here are a couple of examples for setting addresses and routes:
Add IP address 192.168.1.100 with 24-bit network prefix to network device
eth0. At the same time, a local route to 192.168.1.0/24 is added for eth0:
ip addr add 192.168.1.100/24 dev eth0
Adding default route to Internet via host 192.168.1.1. After the previous
command, it could be assumed that this host can be found at interface eth0:
ip route add default via 192.168.1.1
IPtables tool
The iptables tool can be used for filtering traffic and to implement NAT
forwarding.
To drop all incoming packets from IP subnet 10.1.1.0/24:
iptables -A INPUT -s 192.168.1.0/24 -j DROP
To drop incoming packets destined to TCP port 22 (i.e., ssh):
iptables -A INPUT -p tcp --dport 22 -j DROP
Add network address translation from network 10.100.1.0/24 to network interface
eth0. This network could be, for example a virtualized container or other
separate network namespace in local machine:
sudo iptables -t nat -A POSTROUTING -s 10.100.0.0/24 -o eth0 -j MASQUERADE
Typically, when using a NAT to pass traffic from private address spaces to the Internet, the host is forwarding packets from some other sender, for example from a virtual machine, container or namespace. Therefore IP forwarding needs to be enabled in Linux. It is disabled by default:
sudo sysctl -w net.ipv4.ip_forward=1
Network namespaces
Network namespaces are isolated network domains with separate network interfaces, IP addresses and route tables. They are a building block for creating isolated domains, e.g., for Docker containers, but can be used for various network experimentation needs. Mininet is one tool that uses network namespaces to create the emulated network environments.
First, network namespace needs to be added using the IP tool. Here we name our
namespace as ns1:
ip netns add ns1
Then we create a virtual Ethernet interface pair. One end of the veth interface
is titled veth0, and the other end is veth1:
ip link add veth0 type veth peer name veth1
One end of the veth interface pair, in this case veth1 is moved under our
network namespace ns1:
ip link set veth1 netns ns1
We set IP address for veth0 at the host machine (i.e., root namespace), and
bring the interface up so that it can be used:
ip addr add 192.168.76.1/24 dev veth0
ip link set veth0 up
When commands are to be run in a network namespace, they need to be prefixed
with ip netns exec ns1 (or whatever happens to be the namespace name instead
of ns1). Therefore, to do the same operations as above for setting IP address
and activating the interface veth1 that is now under the namespace, we do the
following:
ip netns exec ns1 ip addr add 192.168.76.2/24 dev veth1
ip netns exec ns1 ip link set veth1 up
You could also run any other applications under the namespace in a similar way, for example just ping, some network servers or other applications. The applications do not need to be just command line applications, also graphical applications should work, so you could also run, for example, a web browser in the namespace.
For example running ping across the veth interface to the root namespace:
ip netns exec ns1 ping 192.168.76.1
If you know that you will be operating in the namespace for a while, executing
multiple commands, you could just start a bash shell in the namespace. Then
you don’t need the ip netns exec ns1 prefix with the remaining commands:
ip netns exec ns1 bash
Virtual TUN interface
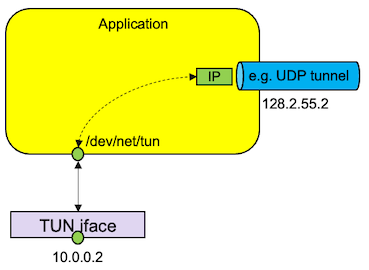
Another type of virtual interface is the TUN interface that can be used for operating with raw IP packets. This is a common method for building tunnels for IP packets, for example encapsulating then inside UDP datagrams across another network interface for passing the packets to another destination that decapsulates the IP packet from inside the UDP datagram. As example use cases, together with encryption, TUN interfaces can be used to build secure virtual private networks, or they could be used for network emulation, if delays or packet losses are enforced on the tunneled packets.

Like the other operations, TUN interface can be set up with the ip tool.
First, the interface is created and activated:
ip tuntap add dev tun0 mode tun
ip link set tun0 up
Then an IP address is assigned and route is added:
ip addr add 10.0.0.1/24 dev tun0
ip route add 10.0.0.0/24 dev tun0
The IP packets that are sent through the TUN interface can be read in the
filesystem from /dev/net/tun device using normal I/O operations, i.e. first
opening a file, and then using read call. The call returns the full packet,
including the IP header and transport header. Similarly, when writing data back
to the network interface, you can use the write call that contains IP header,
and then the rest of the packet.
Using TUN interface with Rust
If you are working with Rust, there is a tun crate for providing helpful APIs for the needed operations. See the crate documentation about how to use the library.